
A successful real estate listing requires more than professional photos and an MLS entry. Behind every well-organized listing campaign is a process that helps agents prepare the property, coordinate marketing, communicate with sellers, and evaluate results.
For new real estate agents, managing all these responsibilities can feel overwhelming. Experienced agents face a different challenge: maintaining consistency while handling multiple listings, clients, and deadlines.
A real estate listing marketing checklist helps bring structure to both situations.
Whether you're preparing your first listing or refining an established marketing process, this guide covers what to do before a property goes live, how to manage marketing after launch, and how to evaluate your efforts.
You'll also find a printable checklist you can adapt to your own listing workflow.
Why Every Real Estate Agent Needs a Listing Marketing Checklist

Listing marketing is a coordinated process involving property preparation, photography, pricing discussions, advertising, MLS data, showing arrangements, and seller communication.
When these activities aren't organized, important details can be overlooked.
For example, an agent might schedule photography before the property is ready, publish an incomplete description, or forget to confirm that the listing appears correctly on approved marketing channels.
A repeatable checklist helps agents:
✔ Organize responsibilities and deadlines.
✔ Maintain consistent marketing standards.
✔ Reduce avoidable listing errors.
✔ Set clear expectations with sellers.
✔ Monitor marketing activity and buyer interest.
✔ Identify improvements for future listings.
The goal isn't to make every listing campaign identical. Different properties, price points, seller circumstances, and local markets require different approaches.
Instead, a checklist creates a reliable foundation that agents can customize for each property.
Before Going Live: Prepare the Property and Marketing Materials
The work completed before a listing launches can influence how effectively the property is presented to prospective buyers.
1. Complete a property preparation walkthrough 
Walk through the property with the seller and identify areas that may need attention before photography or showings.
Discuss cleaning, decluttering, landscaping, lighting, minor repairs, and furniture placement.
Focus on practical improvements that support the property's presentation without automatically recommending expensive renovations.
Create a preparation schedule with responsibilities and completion dates.
2. Coordinate professional photography

Photography is a central component of digital listing marketing because buyers frequently encounter properties online before arranging an in-person visit.
Before scheduling the photographer:
✔ Confirm the property will be ready.
✔ Review lighting and room presentation.
✔ Identify important interior and exterior features.
✔ Discuss whether video, floor plans, or virtual tours would be appropriate.
✔ Confirm image usage rights and delivery expectations.
Review completed images for quality and accuracy.
Avoid misleading editing, inaccurate virtual staging, or imagery that conceals material property conditions.
3. Write an accurate, compelling property description 
A strong property description communicates useful information without relying on exaggerated claims.
Start with verified features, such as the property's layout, major improvements, outdoor spaces, and relevant amenities.
Then organize those details into a readable description that helps buyers understand the property.
For example, instead of writing:
Beautiful home with everything you could ever want!
Consider:
Three-bedroom home featuring an open living and dining area, updated kitchen countertops, and a rear patio overlooking the backyard.
Use only details verified for the actual property.
Property descriptions should also follow Fair Housing advertising requirements. Focus on the property and its features rather than describing preferred types of occupants or buyers.
4. Establish the marketing timeline
Before publication, discuss the proposed launch schedule with the seller.
Confirm photography dates, listing activation, showing availability, marketing materials, and any planned open house.
Obtain necessary approvals and document expectations.
A clear timeline reduces last-minute confusion and gives the seller a better understanding of the marketing process.
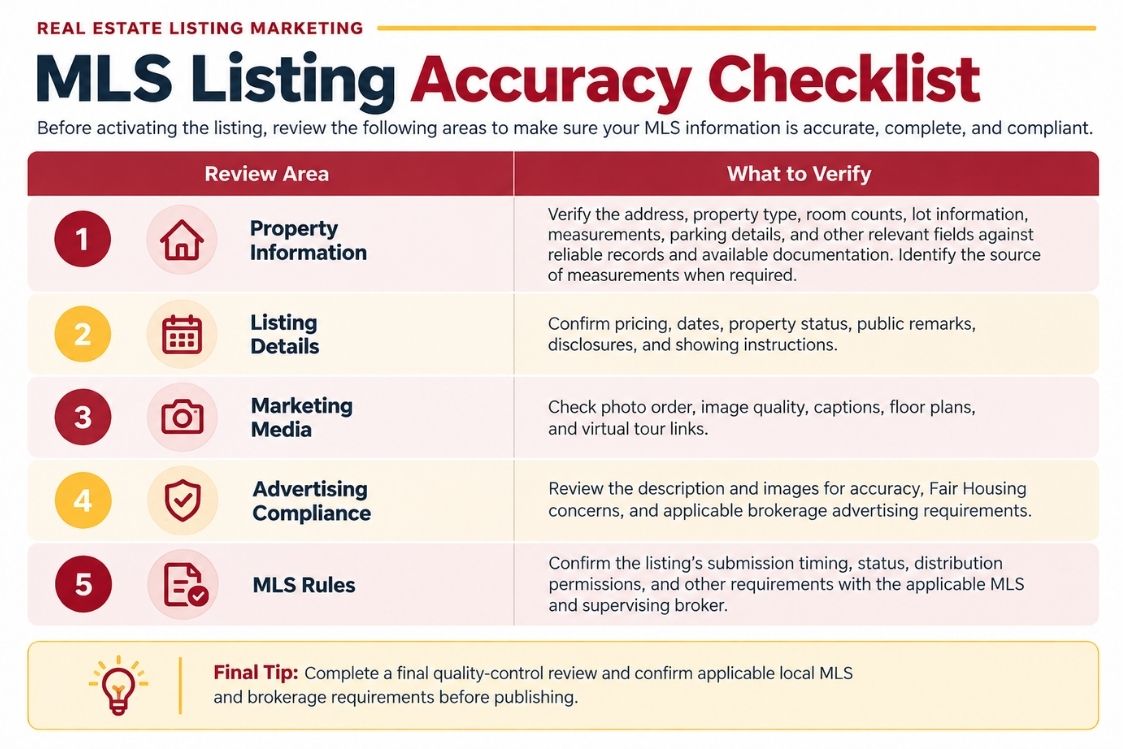
MLS Listing Accuracy: What to Verify Before Publishing
Accurate MLS information is essential to a professional listing campaign.
An incorrect square footage figure, property feature, listing status, or showing instruction can create confusion for buyers, cooperating agents, and sellers.
The National Association of REALTORS® maintains policies concerning MLS participation and public marketing. However, agents should not assume that every MLS uses identical procedures or listing options.
A final quality-control review before publication is a worthwhile habit, even for experienced agents.
After Going Live: Launch and Distribute the Listing
Publishing a listing in the MLS is an important milestone, but it isn't the end of the marketing process.
Once the listing is active, agents should verify that the marketing campaign is functioning as intended.
1. Check the live listing
Open the published listing and review it as a prospective buyer might.
Confirm that the photographs display correctly, the description is readable, property details are accurate, and approved links function properly.
Where syndication is enabled, check important consumer-facing platforms for discrepancies, recognizing that distribution timing and available fields may vary.
2. Coordinate digital marketing
Depending on the property, seller authorization, brokerage policies, and available resources, distribution may include:
✔ Brokerage and agent websites.
✔ Approved social media channels.
✔ Email announcements to appropriate contacts.
✔ Digital listing brochures.
✔ Virtual tours and video content.
✔ Open house promotion.
Keep advertising consistent across channels and make sure required brokerage identification is included.
Avoid presenting a marketing tactic as guaranteed to produce inquiries, showings, or offers.
3. Prepare for showings
Confirm showing instructions, access arrangements, seller preferences, and property security procedures.
Make sure the seller understands how appointments will be requested and how feedback will be collected.
Review any special access restrictions or property conditions with the appropriate parties.
The objective is to create an organized showing experience while respecting the seller's property and schedule. Ensure your listing launch stays professional and compliant. Review Maryland’s real estate advertising requirements to learn more about the rules for advertising real estate listings.
Monitor Showing Feedback and Keep Sellers Informed
After launch, listing management becomes an ongoing cycle of monitoring, communication, and adjustment.
Collect and organize showing feedback
Track completed showings and request feedback through approved brokerage or showing-management systems.
Useful feedback may concern property condition, layout, perceived value, or features buyers consider important.
Remember that feedback is subjective. One buyer's opinion shouldn't automatically drive a major marketing or pricing decision.
Look for recurring themes instead.
Track marketing activity
Depending on available platforms, agents may review listing views, inquiries, showing requests, completed showings, and other engagement indicators.
These metrics provide context, but they don't all measure the same thing.
For example, online views indicate exposure, while completed showings indicate a different level of buyer activity.
Neither guarantees an offer.
Establish a seller communication schedule
Agree on a reasonable update schedule at the beginning of the listing relationship.
A weekly update may work well for some sellers, while others may need more frequent communication during important stages.
A useful seller update can include:
✔ Marketing completed since the previous update.
✔ Inquiries and showing activity.
✔ Relevant feedback themes.
✔ New competing listings or market changes.
✔ Recommended next steps.
When discussing changes to pricing or marketing, use current market evidence and explain the reasoning clearly.
Consistent communication helps sellers understand what is happening, even during periods of limited activity.
Review Listing Performance and Improve Future Campaigns
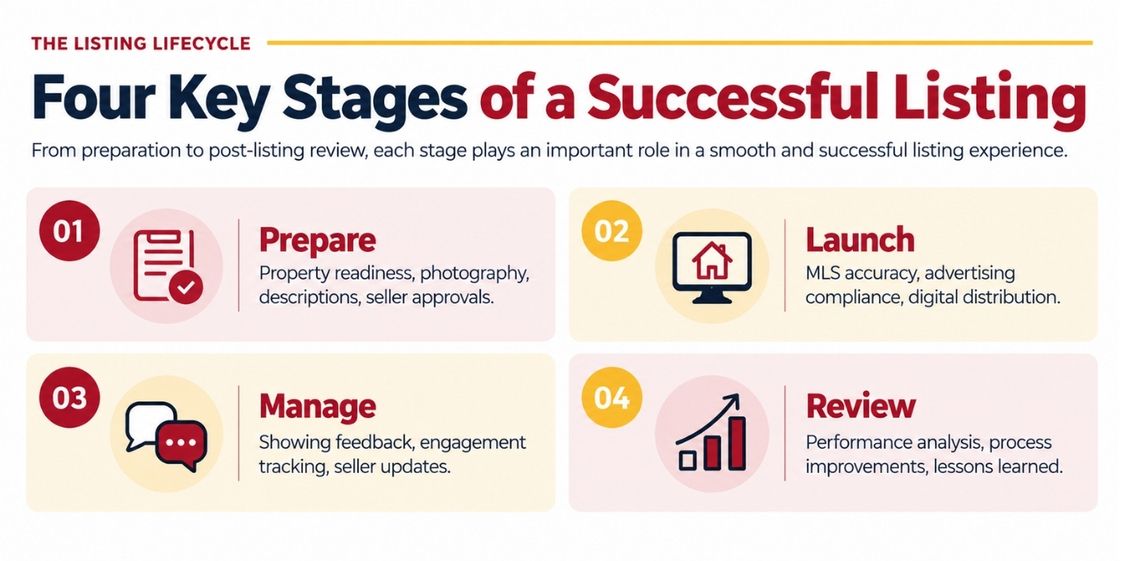
Every listing provides an opportunity to evaluate your marketing process.
A performance review can be completed after a property closes, a listing expires, or a meaningful campaign milestone occurs.
Start by comparing the original marketing plan with what actually happened.
Ask:
✔ Were all preparation tasks completed on schedule?
✔ Did photography and marketing materials meet expectations?
✔ Were there MLS or distribution issues?
✔ Which marketing channels generated measurable engagement?
✔ What feedback patterns emerged?
✔ Were seller updates delivered consistently?
✔ What should change for the next listing?
Avoid judging the entire campaign solely by views, days on market, or the final transaction outcome.
Pricing, property condition, location, competition, financing conditions, and market timing can all affect results.
Document actionable lessons.
For example, if several listings experienced photography delays, you might introduce an earlier preparation deadline. If sellers frequently asked the same questions, you could improve your initial marketing presentation or update template.
These small process improvements can help agents build more organized listing systems over time.
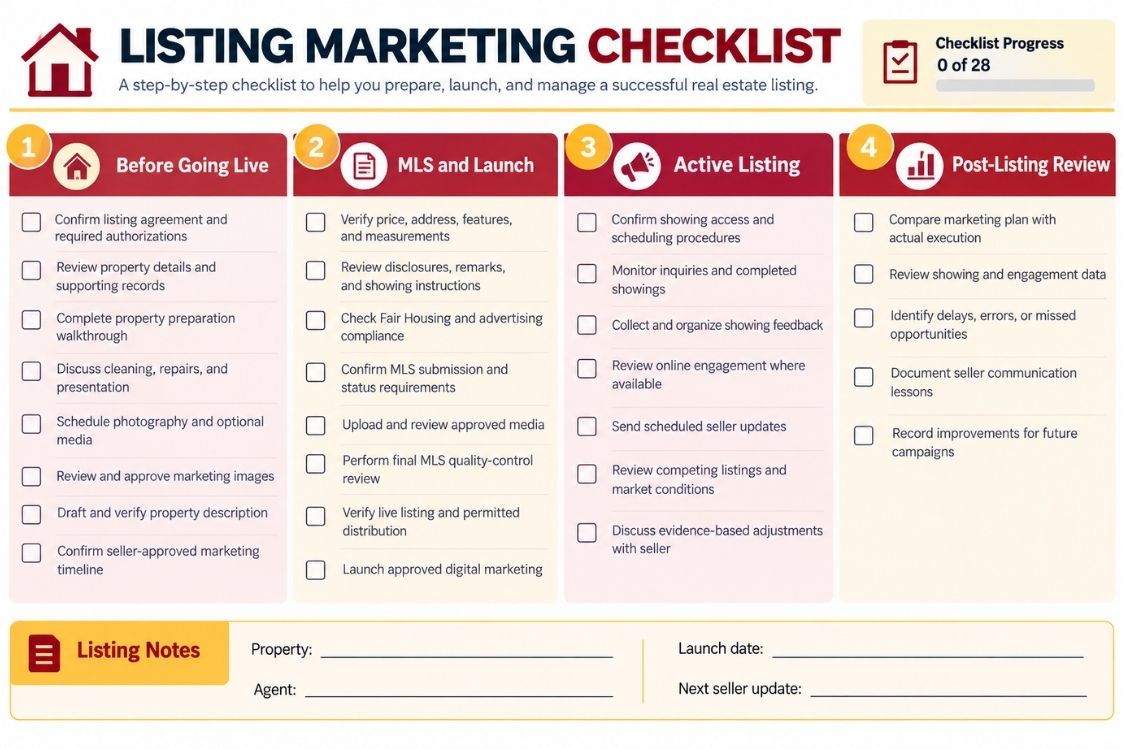
FAQs About Real Estate Listing Marketing Checklist for Agents
What should a real estate agent do before a listing goes live?
Agents should confirm required authorizations, prepare the property, coordinate photography, verify property information, write accurate marketing descriptions, review MLS requirements, and complete a final quality-control check.
How should agents market a listing after it goes live?
After launch, agents should verify the published listing, coordinate approved digital distribution, manage showing access, monitor inquiries, collect feedback, and communicate regularly with the seller.
How often should real estate agents update sellers?
There is no single communication schedule that works for every listing. Agents should establish expectations early and provide updates at agreed intervals, with additional communication when important activity or decisions arise.
What metrics should agents track when reviewing listing marketing?
Useful indicators include listing views, inquiries, showing requests, completed showings, feedback trends, marketing-channel engagement, and progress against the original marketing plan. Availability and reliability of metrics vary by platform.
Conclusion: Better Listing Systems Support Better Agent Practices
A well-managed listing campaign involves preparation, accurate information, thoughtful marketing, ongoing communication, and careful evaluation.
Using a repeatable checklist helps agents organize these responsibilities without overlooking the unique needs of each property or seller.
For new agents, it provides a starting framework. For experienced agents, it creates an opportunity to refine workflows, improve consistency, and evaluate how effectively their systems support clients.
Brokerage training, technology, coaching, and professional collaboration are also worth evaluating when considering how to strengthen a listing business. The availability and quality of these resources should be confirmed with each brokerage.
Grow Your Real Estate Career With the Right Support
Building a successful real estate business takes more than hard work. The right training, tools, guidance, and professional environment can help agents develop stronger systems and grow with confidence.
Interested in learning more about The Southside Group Real Estate?
FROM OUR BLOG


Real Estate Agent Year-End Business Review Checklist
A busy year in real estate does not always mean a profitable or productive year. You may have generated hundreds of leads, completed multiple transactions, invested in marketing, and spent countless hours serving clients. But which activities actually moved your business forward? A real estate agent

Calvert County Events This Weekend | October 29 – November 1, 2026
Calvert County events this weekend are bringing pumpkin patches, Halloween celebrations, fall festivals, creative workshops, and community gatherings to Southern Maryland from Thursday, October 29, through Sunday, November 1, 2026! Whether you're looking for a festive afternoon at a local farm, a cr

Charles County Events This Weekend | October 29 – November 1, 2026
Charles County events this weekend are bringing Halloween excitement, spooky adventures, community celebrations, and plenty of opportunities to enjoy Southern Maryland! Whether you're searching for Halloween events near Waldorf, free trunk-or-treat activities, or something fun to do in La Plata and